Reading and editing the rack
The rack in PATCH's well is the patch itself, in signal order. This page is about reading it, getting around it, turning its knobs, keeping an edit as a new sound, and locking what you like before you breed from it.
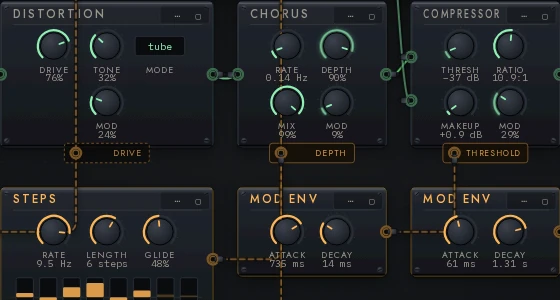
Reading it
Green is sound. Amber is modulation, and the model’s mind. That holds everywhere in the instrument.
- Modules each have a title, on the right of their head the setting that
says which kind of it they are (
saw,svf lp; a click changes it), and all their knobs. Under a knob, its value in its own units (840 Hz,24 ms,−6.0 dB,+12 ¢,8.23 Hz), never as a fraction of its range, then its name; its travel and value are arcs. A setting that is not a knob (an octave) prints its value in the knob's place, over a dotted rule, and a click changes it. The amp's head draws its envelope from its four knobs as set. The selected module (the one you pressed on, or the keyboard stands on) shows its ⋯ menu and its ▢ lock on its top edge, at the right; any module shows them under the pointer, and every module does on a touch screen. - Jacks are small rings. Their color is the kind of signal they carry, and only matching kinds connect. A module with two inputs names them beside the jacks, outside the module, by the cables that arrive (a, b; carrier, mod).
- Audio cables are green, curve from one module's output to the next one's input, and run left to right through the signal chain. Place a module by hand anywhere but clear to the right of the module that feeds it, and the cable between them runs backwards, drawn that way on purpose: out of the output, down below both modules, back under them and up into the input, in straight lines with rounded corners. A curve bowed wide enough to go back would balloon with the distance; this run reads the same at any length, and says at a glance that the cable goes backwards. Each carries light by its level: once an edit settles, the engine renders the phrase once more and measures every audio cable, and the brighter the cable, the louder the signal on it. A mark on its middle lights one bar per third of the meter's range (−54 dB to 0 dB re 1 V); point at it for the number, measured at rest: −14 dB. Until a new structure is measured its cables sit dim and its marks hollow, and after a knob turn the marks go hollow until the change is measured. While notes sound, the cables move at the level the live voice measures instead.
- Modulation cables are dashed amber, and each one ends in a named
destination under its module:
PITCH,THRESHOLD,MORPH,DEPTH(one nothing is plugged into is drawn faintly until you point at the module). A modulation cable pulses at its modulator’s rate, so you can see a 0.2 Hz sweep before you hear it, and it says how far and how fast it moves the knob: depth 25% · 0.51 Hz, the module's mod depth and the modulator's rate as their knobs are set. It is not measured, so it has no level mark and carries no light. - The last module is always
ENV / OUT: the amp envelope. Every patch has one, with a limiter before it that you can’t remove. Its lead runs to OUT, and past OUT stands the sound's face, measured on its latest render; a click on it plays the sound.
The rack is fitted to its well when it opens, no larger than the size a four-module patch opens at on a 1440 px screen, where every name and value reads, and no smaller than the size each module's name reads at, as large as the app's smallest text: a patch too big for the well at that size shows where it starts, and the rest is a pan away (the well's edges count it, and MAP shows all of it). Drawn smaller than its own size (a wide patch, a narrow window, the catalog open beside it), detail: automatic prints each module's name larger, and its setting once the readouts go: it leaves off the values and labels that would print smaller than the rack's own smallest type; every knob is still a control. Zoomed out by hand past where a knob is big enough to grab, it leaves each module three of its knobs to read, not to grab, so a large patch still says what it is until you zoom in. AUDIO IN's and CAPTURE's buttons stay.
Getting around
The camera's controls sit quietly in the well's bottom-left corner: FIT, −, +, MAP, and the layout's ▾.
| FIT, or ⇧Home | Fit the patch: all of it where its names read, or else where it starts |
| . | Fit what you’re on |
| ⌘0 (Ctrl 0) | Actual size |
| − / +, or ⌘− / ⌘= | Zoom out or in |
| Ctrl and the wheel, or pinch | Zoom at the pointer |
| The wheel, or a drag on bare canvas | Pan |
| Space and drag, or a middle-button drag | Pan from anywhere on the canvas |
| ‹ n and n › at the well's edges | How many modules lie past each side; a press brings the nearest in |
| MAP | Show the minimap, over the corner |
| Shift-click the minimap | Bookmark a spot |
| ⇧1–⇧9 | Jump to a bookmark |
Zoom runs from 0.30× to 2.50× by hand, and the rack fits its well when it opens (from 0.65×, where a module's name reads at the app's smallest text, up to 1.25×), clear of the well's top line, its foot, and the catalog while it is open. Once you have moved the camera, by hand or with the keys (End, the arrows, .), an edit to a patch that is too big to fit whole leaves it where you put it; another sound opens where it starts.
With the keyboard
Tab into the patch, then:
| ← / → | The next module in signal order (the model's guess is one of them) |
| ↑ / ↓ | Into a module's modulators, and back out |
| Home / End | The first module, and the last (the amp, at OUT); from anywhere in PATCH |
| Enter | Into the module's knobs (on the guess: add it) |
| F2, or the menu key | Its ⋯ menu |
| Delete | Delete it (a two-input module asks which input survives) |
| L | Lock it, or unlock it |
| / | A module after it, from the catalog |
| Esc | Out of it |
Inside a module the arrows walk its knobs and buttons, ↑ / ↓ turn a knob, and Esc goes back to the module.
Turning knobs
- Drag a knob up or down, or focus it and press ↑ and ↓. Hold Shift for fine.
- Click a named setting (
saw,square,−2 oct) to cycle it, or reach it with the keyboard and press Space or Enter (with Shift, it goes back). - Press ⌘Z (Ctrl Z) to undo, and ⇧⌘Z to redo.
While you drag, you hear every value the knob passes through. A step sequencer’s bars are knobs too: press one where you want the step and drag (the step sequencer).
A knob always shows the value you last set, and a mark where it was when the sound was kept, once you have turned it. Once you turn it here, PERFORM plays from your value too (opening the circuit).
How it works: when an edit reaches the sound
How it works: when an edit reaches the sound
Knobs, and the octave and wavetable selectors, reach the instrument as you move them. A structural edit re-patches it as soon as the engine has made the edit. Any other selector (a VCO’s wave, say) re-patches it once the engine has rendered the patch again, a fraction of a second later and longer while the engine is busy, because that render measures the level the new sound plays at. Held notes keep sounding through it.
The patch is rendered and checked again before it can play its phrase, so a ▶ pressed before then waits for it, then plays the edit. So does Space, at any level. Edits reach the engine in the order you make them. On a busy machine the next waits its turn: its module is outlined, and the caption under the name says 1 edit waiting.
⌘Z undoes the last thing you did, even if the engine hasn’t finished it yet.
Keep an edit as a new sound
- Change the sound.
- Press KEEP AS NEW.
- On the card that opens, WHICH WOULD YOU REACH FOR?, play A and B with ▶ PLAY (or 1 and 2).
- Press THIS ONE under the one you’d reach for (or ← or →).
The card holds your edit and the original in a random order, unlabeled. Either answer teaches the model, and picking the original teaches it most. The receipt names the new sound and says which side was yours: Kept Warm Wash 2 as new: A was your edit, and you picked it. The new sound is named for what it now is, so its name can differ from the original’s, and the original stays in the bank as it was. Nothing replaces the new sound until it has been in a pick after this one (the bank).
Pressed while your last turn of a knob is still on its way to the engine, KEEP AS NEW waits for it, so what is kept is what you hear: the job slot in the menu bar says keeping your edit first…, with the lamp lit, until the edit lands, and then KEEP AS NEW goes on as if you had pressed it then. ⚡ EVOLVE FROM THIS on an edited sound waits the same way, and says the same.
- CANCEL, or Esc, closes the card and keeps nothing. Your edit stays open.
- SKIP COMPARING keeps the edit as new and teaches nothing.
- PICK THE EDIT, ticked before you press KEEP AS NEW, skips the card once: it keeps the edit as new and tells the model you’d pick it, without hearing the two side by side. Then it unticks itself. LEARNING’s forecasts grades the edits you heard and the ones you asserted apart.
⚡ EVOLVE FROM THIS on an edited sound asks the same question before it breeds, and canceling it cancels the breeding too. With nothing changed, KEEP AS NEW stays disabled, and its tooltip says Nothing to keep yet: turn a knob first.
A knob’s whole face is grabbable, including under its ticks and value arc, and a jack’s ring answers across its full diameter.
Layout
The layout's ▾, in the well's corner, names the layout you’re in and opens a menu:
| chain | The signal path on one baseline (the subtitle says in signal order) |
| compact | The same path, packed tight |
| by hand | Yours. Drag a module by its face and it snaps to the grid; hold Shift to place it freely |
| snap to the grid | Pin every module where it sits, on the 24 px grid. This is how you start arranging a bred patch by hand |
| reset positions | Throw away the hand positions, and lay the patch out along the signal chain again |
| detail | automatic leaves off labels too small to read (names and settings print larger), and leaves three knobs to read on modules too small to grab; or force full or compact |
snap and reset act only on a layout by hand. Positions are kept for each patch, survive a reload and a ⚡ generation, and travel in a downloaded patch file. If a hand layout has spread past what the frame can show, SNAP lays it out again from the signal chain instead.
Locks, and evolving from here
- Lock what you like:
- click a knob’s lock dot (it shows on hover and focus) to lock that knob, or press L on it;
- select a module and press L, or click its ▢, to lock the whole module; a locked module's edge is solid amber;
- in ⚡ EVOLVE FROM THIS's ▾, press LOCK KNOBS or LOCK WIRING to lock every knob, or the whole structure.
- Press ⚡ EVOLVE FROM THIS.
- Play the child when it lands at the top of the bank.
Breeding then changes everything except what you locked. CLEAR LOCKS, in the same ▾, releases them all.
The button reads ⚡ EVOLVING…, and the job slot in the menu bar shows ⚡ evolving Soft Pad with STOP, which drops the walk and adds nothing; ⚡'s ▾ has STOP EVOLVING too. The rack, the bank, and the pairs go on answering while it walks. When the child lands it becomes the sound you're playing by itself only if nothing has changed under your hands since the press: you're still on the sound ⚡ started from, unedited, you haven't opened another, and nothing is sounding (no notes held or latched by HOLD or the arp, no ▶ phrase playing, no input you're monitoring). Otherwise it waits at the top of the bank, and its toast says why (your edits are still open, Soft Pad is still the sound in hand, what you’re playing goes on) with an OPEN IT button.
⚡ and EVOLVE POOL take turns. While a generation breeds, ⚡ is disabled and its tooltip says why; while ⚡ walks, EVOLVE POOL waits the same way.
How it works: what a lock holds
How it works: what a lock holds
⚡ is one walk from the sound you’re playing, and the engine counts it as a
generation of its own. It runs on the render farm. With no render farm (a
single-core machine, ?farm=0, or no worker free to take it), it runs in the
engine itself. There it can’t be stopped, and the job slot shows no STOP.
A lock is a set of exact addresses in the patch. A change that would alter, delete, or create anything at a locked address is refused. Both directions matter: allowing a birth at a locked address, while refusing the death that would undo it, would let the search drift into locked structure and stay there.
One limit: a structural change that grows a brand-new address inside a locked module isn’t caught, because that address existed in neither version. A lock is a promise about addresses, not about everything under them. Locks in the reference has the rule.
The ⋯ menu
The selected module’s ⋯ (or right-click any module, hold a finger on it, or press F2 on it). It opens inside the well, upward when there is no room below, so it never covers the readout at the well's foot. Taller than the well, it is cut to the well's height and its list scrolls:
| replace with… | Another module in this socket. It keeps what feeds it |
| insert before… | A new module between this one’s input and it. Grayed on a source, which has no input |
| insert after… | A new module between this one and what it feeds |
| duplicate | A second one in series, with the same settings. Grayed on a source |
| set aside | Leaves the socket empty and silent. Drag it back any time |
| bypass | The input passes straight through. Grayed on a source |
| modulate → destination | Opens the catalog at the modulators, for this module’s modulation input. Only on a module that has one |
| probe this output | A little scope on the out ○: the patch rendered as if it ended here |
| what goes here? (Q) | The model's guess for this place: after it, on its modulation slot, or in it if the socket is empty. Drawn there, dashed amber; Enter adds it (the guess) |
| swap the two inputs | On the six two-input modules only |
| delete | Below a rule, in red. A source leaves its socket empty |
replace with…, insert…, and modulate hand off to the catalog with the socket already chosen and lit, so there is one list of modules in one place. A modulator’s own ⋯ has three rows: replace with…, what goes here? (the guess for its module's slot) and unplug this modulator.
Anything you bypass or delete is set aside rather than disappearing (SET ASIDE n at the well's foot), and stays there across a reload.
Empty sockets
Unplug a cable, set a module aside, delete a source, or move a source into another socket, and the socket it leaves is empty. It shows as a small dashed module titled empty, it’s listed as empty under IN THIS PATCH, and it’s silent. On one side of a mix, only that side goes quiet.
If the empty socket was the patch’s only source, the whole patch is silent. The subtitle under its name says silent: nothing reaches the output, the face at OUT and KEEP AS NEW wait for a source, and the line above the well says nothing to rate: no source reaches the output.
- Pick any source in the catalog. The empty socket is the one already chosen.
- Place it, or press ⌘Z, and you hear the patch again.
The model hears an empty socket too: empty sockets is one of the qualities it weighs.
Downloading a patch
In ⌘K, Download this patch writes a patch file, and Download as a picture… draws the rack as a PNG or SVG, at a size and background you choose. The picture carries the patch inside it: open an Auracle PNG or SVG with Open a patch file…, or drop it on the window, and you get the same sound back.
What to try next
- Lock a module you like and press ⚡ EVOLVE FROM THIS a few times.
- Hold ⌥ (the model view), and see which kinds of module your taste leans toward.
- Wiring and the catalog: add a module, or rewire one.